|
|

|

|
|
|
|
|
|
|
|
|
|
|
|
|
|
|
|
|
|
|
|
|
|
|
|
|
PC Moderator - How it Works
|
|
|
|
|
|
|
|
|
Click here to view quick installation guide
|
|
|
|
|
|
Installation
|
|
|
|
|
|
|
|
|
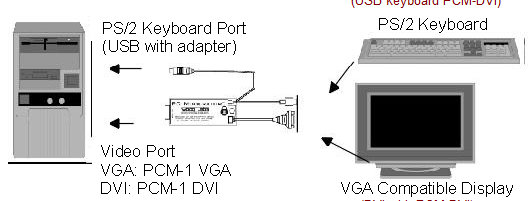
The PC Moderator is installed by plugging into and locking to the VGA (PCM-1 VGA) or
DVI (PCM-DVI model) video port of the computer. The VGA video display cable then connects to the video cable of the PC Moderator. This arrangement allows the PC Moderator to intercept the video display signals. The PC Moderator receives its power from the cable connected to the computer's keyboard or USB port. If this cable is disconnected, the PC Moderator and the output to the display are turned off. An internal lithium battery provides back-up power for the built-in real time clock when the computer is powered off or the device is unplugged or removed.
|
|
|
|

|
|
|
|
|
|
|
|
|
|
|
|
|
|
|
|
|
|

|
|
|
|
|
|
|

|
|
|
|

|
|
|
|
|

|
|
|
|
|
|
|
|
|
|
|
|
|
|
|
|
|
|
|
|
|
|

|
|
|
|
|
|
|
Easy First Time Setup
|
|
|
|
|
|
|
|
|
|
Before the brand new (or reset) PC Moderator has been configured, it is available for the easy first time setup. Once the computer is powered and the operating system loaded, the user presses Scroll Lock (Num-lock if using USB Upgrade Kit or PCM-DVI models) key twice. After the screen turns blank, the user presses the [Enter] key and the PC Moderator starts the first time setup. The user answers the questions in a simple step-by-step process to set the internal clock, Parent and Setup passwords and configure the individual user settings. The user settings include name, password and time limit and range settings. Separate settings can be made for each day of the week and a special holiday/vacation setting.
|
|
|
|
|
|
|
|
|
|
|
Operation
|
|
|
|
|
|
|
|
When using the computer with the PC Moderator installed, users must first log in by selecting their user number - 1 through 8 (child users), 9 (Parent user) or 0 (Setup user). If the password is then entered correctly, the display and keyboard are enabled for as long as they are allowed according to the PC Moderator's setup. Parent and Setup users have unlimited time with the Setup user able to access the Setup Menu for configuration. On screen prompts are provided using flashing color patterns. To access the Setup Menu, the parent logs in as a Setup user (0) then presses the Scroll Lock (Num-Lock with USB Upgrade Kit or DVI models) key twice. After the screen turns blank, the user presses the [Enter] key. The Setup Program runs automatically. The Setup Menu allows the setting of the clock, passwords, user and advanced settings and usage reports. The Setup menu allows the direct editing of all user settings.
|
|
|
|
|
|
|
|
|
|
|
|
|
|
|
|
|
|
Click here for additional information on product security...
|